Getting List of Host Names in the Subnet – Windows

Getting List of Host Names in the Subnet – Windows

Introduction:

Identifying host name associated with IP Address in Windows is simple work. So here am going to demonstrate how to get multiple host names which are available in the same subnet.

How we can do it:

Usually we can get the Host name associated with the IP address using the following command.

NBTSTAT -a [Computer IP Address]

The Above given command will return the HOST NAME associated with the IP address given.

Mixing it With DOS Batch Script:

By Mixing this command with DOS Batch script we can get multiple Host names available in the SubNet.

For Loop in DOS Script:

FOR /L %%varaible IN ( START STEP END) DO  COMMAND

%%Variable is the Name of the variable

START- Start value for the FOR Loop

STEP- Step value for the FOR Loop

END- End value for the FOR Loop

COMMAND- Command to execute multiple times

Putting it Together:

Save the following code in a file with .BAT extension


FOR /L %%A IN (0 1 255) DO NBTSTAT -A "192.168.1.%%A">>File.txt

Running the program

So now run the bat file and see the File.txt in the current directory of Bat file it will contain details of the Host names in the SubNet

Using Boost Library in Eclipse CDT with Cygwin and MinGW

Using Boost Library with Eclipse

Introduction

The purpose of this blog is to show how to use the boost library in Eclipse CDT plug-in with Cygwin and MinGW compiler.

About Boost Library:

Boost is an Internet community dedicated to building and reviewing C++ libraries. The initial members of Boost were C++ Standards Committee members who wanted to create a forum for developing libraries that might some day become part of the C++ Standard. Boost emphasize libraries that work well with the C++ Standard Library. Boost libraries are intended to be widely useful, and usable across a broad spectrum of applications. The Boost license encourages both commercial and non-commercial use. Boost works on almost any modern operating system, including UNIX and Windows variants. Follow the Getting Started Guide to download and install Boost. Popular Linux and Unix distributions such as Fedora, Debian, and NetBSD include pre-built Boost packages.

Eclipse CDT:

The CDT Project provides a fully functional C and C++ Integrated Development Environment based on the Eclipse platform. Features include: support for project creation and managed build for various toolchains, standard make build, source navigation, various source knowledge tools, such as type hierarchy, call graph, include browser, macro definition browser, code editor with syntax highlighting, folding and hyperlink navigation, source code refactoring and code generation, visual debugging tools, including memory, registers, and disassembly viewers.

( click here to download eclipse for C++)

Cygwin:

Cygwin is a Linux-like environment for Windows. It consists of two parts:

  • A DLL (cygwin1.dll) which acts as a Linux API emulation layer providing substantial Linux API functionality.
  • A collection of tools which provide Linux look and feel.

The Cygwin DLL currently works with all recent, commercially released x86 32 bit and 64 bit versions of Windows, with the exception of Windows CE.

MinGW:

  • MinGW, a contraction of “Minimalist GNU for Windows”, is a minimalist development environment for native Microsoft Windows applications.
  • MinGW provides a complete Open Source programming tool set which is suitable for the development of native MS-Windows applications, and which do not depend on any 3rd-party C-Runtime DLLs (only the Microsoft C runtime, MSVCRT).

Downloading and Installing Cyginwin:

Note: click here to download cygwin

Follow the following steps to install cygwin,

  1. Run the Cyginwin setup.
  2. Select install from Internet
  3. Set the root directory as C:\cygwin
  4. Set the local directory for the installation files
  5. Configure the internet settings, Direction connection or Proxy settings.
  6. Select the mirror site
  7. Select the core components or allow the default selection and give next.

Download and Install MinGW compiler:

Click here to download MinGW compiler

Download the MinGW compiler and accept the default settings and install the MinGW compiler

Make sure to select the GCC compler

Download boost Source and bjam tool:

Click here to download the boost source and bjam tool.

Installing Boost library:

  • Add the path of the cygwin in environment variable
  • Add the path of minGW compiler in environment variable
  • Extract the Eclipse in C:\Eclipse directory
  • Extract the boost package in C:\Program Files\boost\
  • Extract the bjam tool in C:\Program Files\boost\boostxxx.\
  • Go to the command prompt give the following command
C:\Program Files\boost\boost_1_44_0>bjam --toolset=gcc --build-type=complete

Note: build process will take lot of time to finish. Wait patiently.

Using Boost lib in Eclipse

  • Open Eclipse->File -> New -> C++ project
  • Empty project and accept other default options
  • Right click the project and add new Source file ( shown in the screen shot )


  • Select the project Properties
  • Select the path and Symbol’s under C/C++ General category.
  • Select GNU C and click add button

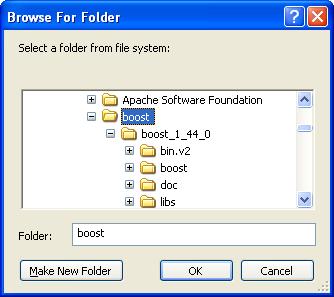
Now you can enter the boost path or explore the path using File System button. it show like as follows.


Repeat the same process for GNU C++


Adding the code:

Add the following code in main.cpp file

#include <iostream>
#include <boost/foreach.hpp>
using namespace std;

int main() {
 cout<<"Boost Demo"<<endl;
 int a[10];
 for(int i=0;i<10;i++)
 {
 a[i]=i+10;
 }
 BOOST_FOREACH(int k, a)
 {
 cout<<"\t"<<k;
 }
 return 0;
}

Build and Run the Project:

Click project-> Build Project

Click Run Command to run the project

See the output in Console tab

Handling properties file using Java

Handling properties file using Java

Introduction:

Properties are configuration values managed as key/value pairs. In each pair, the key and value are both String values. The key identifies, and is used to retrieve, the value, much as a variable name is used to retrieve the variable’s value. For example, a Client Server application should communicate with each other,so the Server information has to be stored in Client in  order to establish the communication with the Server. The server information like IP Address can be stored and retrieved from the Properties file.

Basics on Handling Properties file:

The following procedures has to be followed in order to write Properties to Properties file.

The following procedures has to be followed in order to Read Properties from Properties file.

  • Create instance of Properties file.
  • Load the FileInput Stream Object
  • Read the Value using the Key value. ( using getProperties method )
  • Close the Input Stream Object

Click here to see more details on Properties class.

Example:

The following example shows how to Write Properties into Properties file.

/* PropTest.java by elangovan */
import java.util.*;
import java.io.*;
class PropTest
{
	public static void main(String args[]) throws IOException
	{
		if( args.length < 2)
		{
			System.out.println("Usage: PropTest <UserName> <FavColor>");
			System.exit(0);
		}
		Properties prop=new Properties();
		FileOutputStream out=new FileOutputStream(new File("UserSetting.ini"));
		prop.setProperty("UserName",args[0]);
		prop.setProperty("FavColor",args[1]);
		prop.store(out,"");
		out.close();
	}
}

Running the program

javac PropTest.java
java PropTest MyName Blue

The following example shows how to Read from Properties file.

/* PropTest.java by elangovan */
import java.util.*;
import java.io.*;
class PropReadTest
{
	public static void main(String args[]) throws IOException
	{
		String UserName="",FavColor="";
		Properties prop=new Properties();
		FileInputStream fin=new FileInputStream(new File("UserSetting.ini"));
		prop.load(fin);
		UserName = prop.getProperty("UserName");
		FavColor = prop.getProperty("FavColor");
		fin.close();
		System.out.println("User name is:"+UserName);
		System.out.println("Favourte Color is:"+FavColor);
	}
}

Running the program

javac PropReadTest.java
java PropReadTest

Getting IP Address of Machine in VC++

Getting IP Address of machine in VC++

Introduction:

Here we can see how to get the multiple ip address available in machine and display it in Multi line text box in MFC.

How To start:

here am used MFC dialog based application you can change it accordingly.

note: make sure to select Socket support in Application Wizard

How to make Multi line text Box in MFC:

To make a Editbox as multi line text box follow this procedure .

  • Select the edit box and select the properties
  • Select Multiline checked
  • Select want return checked

Selection will look like as follows

  • Create member variable as Value type using Class Wizard. to insert a new line in edit box we should use “\r\n“.
  • for example if the member variable is m_Text we can use as follows
m_Text="\r\n Hi \r\n This \r\n Multiline \r\n Sample";

Code To Get the IP Address:

The following code gets and displays the IP Address of the machine in the edit box.

void CDispalyIPAddressDlg::OnGetIP()
{
 UpdateData(TRUE);
 char HostName[128];
 //Get host name and Check is there was any error
 if (gethostname(HostName, sizeof(HostName)) == SOCKET_ERROR)
 {
 AfxMessageBox("Error in Getting Host Info");
 CDialog::OnCancel();
 }
 //Get the ip address of the machine using gethostbyname function
 struct hostent *IpList = gethostbyname(HostName);
 m_List+="Host Name is:";
 m_List+=HostName;
 m_List+="\r\n";
 if (IpList == 0)
 {
 AfxMessageBox("Yow! Bad host lookup.");
 CDialog::OnCancel();
 }
 m_List+="\r\n\r\nIP Address Available are:\r\n";
 m_List+="----------------------------------------------------------\r\n";
 //Enumerate list of Ip Address available in the machine
 for (int i = 0; IpList->h_addr_list[i] != 0; ++i)
 {
 struct in_addr addr;
 memcpy(&addr, IpList->h_addr_list[i], sizeof(struct in_addr));
 CString str=inet_ntoa(addr);
 m_List=m_List+ str;
 m_List+="\r\n" ;
 }
 m_List+="-----------------------------------------------------------\r\n";
 UpdateData(FALSE);
}

Final Output

Final looks like in the following screen shot.

Read more of this post

Connecting Java and MySQL using JConnector

Connecting Java and MySQL using JConnector

Here we can see how to connect a Java Front end with MySQL DB using JConnector. There are lot of ways to connect Java and MySQL. JConnector is is one of the best solution to do that. You can choose the your option based on your requirement.

Software Requirements:

  • MySQL ( Click here to download )
  • JConnector( click here to download )
  • JDK ( click here to download )

Step By Step Process:

  • Copy the JConnector JAR file to the following path,

C:\Program Files\Java\jre6\lib\ext

  • Set the Class path:
  1. Right click the My Computer select Properties
  2. Select advanced tab
  3. Select Environment Variables: Create/Modify the CLASSPATH variable.
  4. Add the following in CLASSPATH “C:\Program Files\Java\jre6\lib\ext\mysql-connector-java-5.1.7-bin.jar” (Note: if you are modifying the CLASSPATH variable prefix “;” before the path)
  • Create a table and insert data.
use test;
create table User(UserName varchar(30),Age integer);
insert into User values(“Name1″,24);
insert into User values(“Name2″,25);
insert into User values(“Name3″,26);
  • Creating a Front End Java code to communicate with the DB. For demonstration I used Simple Console application.

import java.sql.*;
class JavaTest
{
 public static void main(String args[])
 {
 Connection conn = null;
 Statement stmt = null;
 ResultSet rs = null;
 try
 {
 String userName = "root";
 String password = "admin";
 String url = "jdbc:mysql://localhost/test";
 Class.forName("com.mysql.jdbc.Driver").newInstance();
 conn = DriverManager.getConnection(url, userName, password);
 System.out.println("After GetConnection");
 stmt = conn.createStatement();
 String quary = "select * from User";
 rs = stmt.executeQuery(quary);
 while (rs.next())
 {
 System.out.println("User Name is:"+rs.getString(1));
 System.out.println("User Age is:"+rs.getString(2));
 }
 }
 catch (Exception e)
 {
 e.printStackTrace();
 }
 finally
 {
 if (conn != null)
 {
 try
 {
 conn.close();
 }
 catch (Exception e)
 {
 System.out.println("Error Closing Connection");
 }
 }
 }
 }
}